Kochava
Integrate Purchases SDK with Kochava for precise revenue tracking
With our Kochava integration you can:
- Accurately track subscriptions generated from Kochava campaigns, allowing you to know precisely how much revenue your campaigns generate.
- Send trial conversions and renewals directly from RevenueCat to Kochava, allowing for tracking without an app open.
- Continue to follow your cohorts for months to know the long tail revenue generated by your campaigns.
Integration at a Glance
| Includes Revenue | Supports Negative Revenue | Sends Sandbox Events | Includes Customer Attributes | Sends Transfer Events | Optional Event Types |
|---|---|---|---|---|---|
| ✅ | ✅ | Requires Sandbox App GUID | Certain Reserved Attributes only | ❌ | non_subscription_purchase_event expiration_event billing_issue_event product_change_event |
1. Install Kochava SDK
Before RevenueCat can integrate with Kochava, your app should be running the latest Kochava SDK. Refer to the Kochava developer documentation for the latest installation instructions.
2. Send device data to RevenueCat
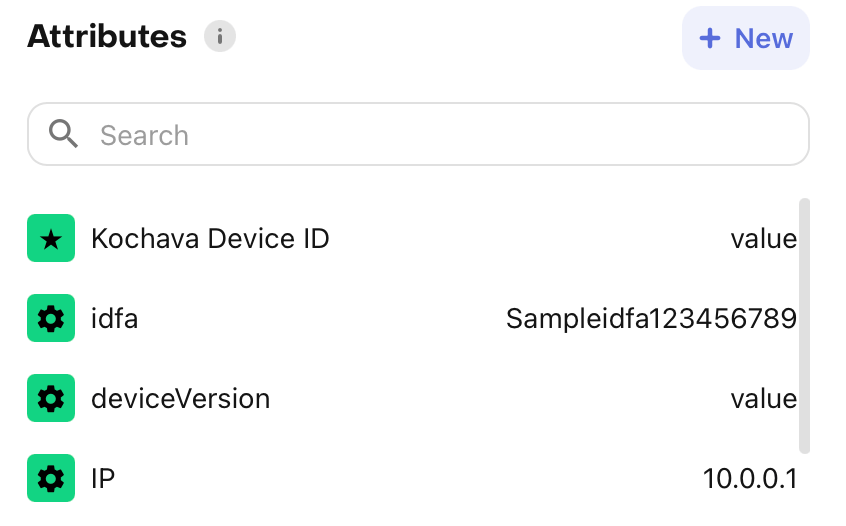
The Kochava integration requires some device-specific data. RevenueCat will only send events into Kochava when the required identifiers and Customer Attributes below are set for the device platform.
$kochavaDeviceId and $deviceVersion are supported on versions 5.4.0+ of the iOS SDK, and 8.8.0+ of the Android SDK. Support in other SDKs is coming soon.
| Key | Description | Required |
|---|---|---|
$kochavaDeviceId | The unique Kochava Device ID | ✅ |
$ip | The IP address of the device. This is gathered server-side when $ip is set to true. | ✅ |
$deviceVersion | Device, platform and version information. This is gathered server-side when $deviceVersion is set to true. | ✅ |
$idfa | iOS advertising identifier UUID | ✅ (iOS, one of $idfa or $idfv) |
$idfv | iOS vendor identifier UUID | ✅ (iOS, one of $idfa or $idfv) |
$gpsAdId | Google advertising identifier | ✅ (Android, one of $gpsAdId or $androidId) |
$androidId | Android device identifier | ✅ (Android, one of $gpsAdId or $androidId) |
These properties can be set manually, like any other Customer Attributes, or through the helper methods collectDeviceIdentifiers() and setKochavaDeviceID().
- Swift
- Kotlin
import AdSupport
import Purchases
// ...
Purchases.configure(withAPIKey: "public_sdk_key")
// ...

// Automatically collect the $idfa, $idfv, and $ip values
Purchases.shared.attribution.collectDeviceIdentifiers()

// Set the Kochava Device ID
Purchases.shared.attribution.setKochavaDeviceID(kochavaDeviceId)
//..
Purchases.configure(this, "public_sdk_key")
//..

// Automatically collect the $gpsAdId and $ip values
Purchases.sharedInstance.collectDeviceIdentifiers()

// Set the KochavaDeviceID
Tracker.getInstance().retrieveDeviceId { deviceId ->
    Purchases.sharedInstance.setKochavaDeviceID(deviceId);
}
You should make sure to set attributes after the Purchases SDK is configured, and before the first purchase occurs. It's safe to set attributes multiple times, as only the new/updated values will be sent to RevenueCat.
If you are requesting the App Tracking permission through ATT to access the IDFA, you can call .collectDeviceIdentifiers() again if the customer accepts the permission to update the $idfa attribute in RevenueCat.
The AdSupport framework is required to access the IDFA parameter on iOS. Don't forget to import this into your project.

Make sure to remove all client-side tracking of revenue. Since RevenueCat will be sending events for all revenue actions, tracking purchases with the Kochava SDK directly can lead to double counting of revenue in Kochava.
(Optional) Send campaign data to RevenueCat
RevenueCat itself is not an attribution network, and can't determine which specific ad drove an install/conversion. However, if you're able to collect this information from another source, such as Kochava, it's possible to attach it to a Customer in RevenueCat using Attributes as well. The below reserved key names can be used to optionally attach campaign data to a user. This data will then be sent through to other downstream analytics integrations and accessible via APIs and webhooks.
| Key |
|---|
$mediaSource |
$campaign |
$adGroup |
$ad |
$keyword |
$creative |
3. Send RevenueCat events into Kochava
After you've set up the Purchases SDK to send attribution data from Kochava to RevenueCat, you can "turn on" the integration and configure the event names from the RevenueCat dashboard.
- Navigate to your project settings in the RevenueCat dashboard and choose 'Kochava' from the Integrations menu
- Add your API key, which can be generated in Kochava. For more information on how to access your API key, see the following documentation.
- If strict authentication rules are enabled in the integration, you can add a Secret API Key. Kochava does not enable this by default. There is currently no place in the UI to access your API Secret, so you need to request it from the Kochava support team.
- At least one App GUID or Test App GUID must be added. This is called
APP GUIDin the Kochava backend. If you perform Sandbox Testing, we automatically send events to the corresponding Test App GUID. For example, if you are testing on Android, we will automatically send events linked to the Android Test App GUID. - Enter the event names that RevenueCat will send. The default names are our best attempt at mapping to Kochava event names. NOTE: You may lose some functionality if you do not use the default names. See this Full List of Standard Events that Kochava supports.
- Select whether you want sales reported as gross revenue (before app store commission) or after store commission and/or estimated taxes.
4. Testing the Kochava integration
You can test the Kochava integration end-to-end before going live. It's recommended that you test the integration is working properly for new users, and any existing users that may update their app to a new version.
Add a Test App GUID in the RevenueCat dashboard
Before you test the integration, make sure you have a Test App GUID set, either for iOS or Android. This is required if you want the integration to trigger for sandbox purchases.
Make a sandbox purchase with a new user
Simulate a new user installing your app, and go through your app flow to complete a sandbox purchase.
Check that the required device data is collected
Navigate the the Customer View for the test user that just made a purchase. Make sure that all of the required data from step 1 above is listed as attributes for the user.
Check that the Kochava event delivered successfully
While still on the Customer View, click into the test purchase event in the Customer History and make sure that the Kochava integration event exists and was delivered successfully.

You should start seeing events from RevenueCat appear in Kochava.